


Visual Regression Testing
Vitest can run visual regression tests out of the box. It captures screenshots of your UI components and pages, then compares them against reference images to detect unintended visual changes.
Unlike functional tests that verify behavior, visual tests catch styling issues, layout shifts, and rendering problems that might otherwise go unnoticed without thorough manual testing.
Why visual regression testing?
Visual bugs don’t throw errors, they just look wrong. That’s where visual testing comes in.
- That button still submits the form... but why is it hot pink now?
- The text fits perfectly... until someone views it on mobile
- Everything works great... except those two containers are outside the viewport
- That careful CSS refactor works... but broke the layout on a page no one tests
Visual regression testing acts as a safety net for your UI, automatically catching these visual changes before they reach production.
Example
Visual regression testing in Vitest can be done through the toMatchScreenshot assertion:
import { expect, test } from 'vitest'
import { page } from 'vitest/browser'

test('button renders in default state', async () => {
  // render your component

  // capture and compare screenshot
  await expect(page.getByRole('button')).toMatchScreenshot()
})
Getting started
Environmental stability
Visual regression tests are sensitive to environmental differences because rendering is not perfectly deterministic across environments and depends on multiple factors:
- GPU, drivers, and hardware acceleration
- Operating System
- Font rendering pipelines
- Browser, browser versions, and settings
- Whether the browser is running headless or headed
- Screen scaling, color profiles, and display settings
- ...and occasionally what feels like the phase of the moon 🌓
In practice, even seemingly identical environments can occasionally produce subtle rendering differences. For this reason, visual regression tests are most reliable when run in a standardized and tightly controlled environment. This is also why Docker containers, CI-only visual testing workflows, or cloud services are strongly recommended.
Not a replacement for behavior testing
When a visual test fails alongside behavior tests, it's harder to tell what's actually broken or why. Visual failures are also expected during intentional UI work, but a failing unit test usually is not. Keeping them separate means each suite can fail loudly for the right reasons.
It's worth calling out that toMatchScreenshot is not a substitute for proper assertions.
A test that renders a button and just takes a screenshot is just documenting the current state. There's no way to tell from a screenshot whether users can interact with the button. Visual tests work best as a complementary layer on top of behavior tests, not a replacement for them.
Put another way, visual testing doesn't tell you why something renders the way it does. It just tells you that something rendered a certain way, or a different way than it did last time.
For example, take a business requirement to sort recent purchases in a table by purchase date. If you're looking only at the visual regression tests, you might notice that the same items from the last test are in a different order. This could be because you just introduced the sorting or because the sorting is broken. Either way, you don't know why the order is different just by looking at the UI. Someone could dismiss the visual diff as noise because the table "looks the same", even though the ordering logic is now broken. Now you have a broken business requirement in production.
Project structure
Separating your visual suite from other tests gives you cleaner failure signals and a more deliberate update workflow. The recommended setup uses projects with a [name].vrt.test.[ext] naming convention to keep them distinct, and runs them in headless mode for consistency. As the browser instance might have a different default size, it also sets a specific viewport size.
import { defaultExclude, defineConfig } from 'vitest/config'

const vrtPattern = '**/*.vrt.test.[tj]s?(x)'

export default defineConfig({
  test: {
    // ...other configurations
    projects: [
      {
        extends: true,
        test: {
          name: 'unit',
          exclude: [vrtPattern, ...defaultExclude],
        },
      },
      {
        extends: true,
        test: {
          name: 'vrt',
          browser: {
            headless: true,
            instances: [
              {
                browser: '[browser-name]',
                viewport: { width: 1280, height: 720 },
              },
            ],
          },
          include: [vrtPattern],
        },
      },
    ],
  },
})
With this configuration in place, add scripts to launch each project separately:
{
  "scripts": {
    "test:unit": "vitest --project unit",
    "test:visual": "vitest --project vrt"
  }
}
Creating references
When you run a visual test for the first time, Vitest creates a reference (also called baseline) screenshot and fails the test with the following error message:
expect(element).toMatchScreenshot()

No existing reference screenshot found; a new one was created. Review it before running tests again.

Reference screenshot:
  tests/__screenshots__/button.vrt.test.ts/button-default-state-chromium-darwin.png
This is normal. Check that the screenshot looks right, then run the test again. Vitest will now compare future runs against this baseline.
提示
Reference screenshots live in __screenshots__ folders next to your tests. Commit them to your repository.
Screenshot organization
By default, screenshots are organized as:
.
├── __screenshots__
│   └── test-file.vrt.test.ts
│       ├── test-name-chromium-darwin.png
│       ├── test-name-firefox-linux.png
│       └── test-name-webkit-win32.png
└── test-file.vrt.test.ts
The naming convention includes:
- Test name: either the first argument of the
toMatchScreenshot()call, or automatically generated from the test's name. - Browser name: depends on the configured browser provider, for example
chrome,chromium,firefoxorwebkit. - Platform:
aix,darwin,freebsd,linux,openbsd,sunos, orwin32.
This ensures screenshots from different environments don't overwrite each other.
Updating references
When you intentionally change your UI, you'll need to update the reference screenshots just as you would update snapshots:
$ vitest --project vrt --updateReview updated screenshots before committing to make sure changes are intentional.
Stale screenshots
Note that screenshots for deleted or renamed tests aren't removed automatically. Clean up the __screenshots__ folder manually when you remove or rename tests, otherwise stale references will accumulate over time.
Debugging failed tests
When a visual test fails, Vitest provides three images to help debug:
- Reference screenshot: the expected baseline image
- Actual screenshot: what was captured during the test
- Diff image: highlights the differences; only generated when the screenshots have the same dimensions (behavior may vary with custom matchers)
You'll see something like this in the CLI output:
expect(element).toMatchScreenshot()

Screenshot does not match the stored reference.
245 pixels (ratio 0.03) differ.

Reference screenshot:
  tests/__screenshots__/button.vrt.test.ts/button-chromium-darwin.png

Actual screenshot:
  tests/.vitest/attachments/button.vrt.test.ts/button-chromium-darwin-actual.png

Diff image:
  tests/.vitest/attachments/button.vrt.test.ts/button-chromium-darwin-diff.png
While in UI mode, Vitest shows a tabbed diff view with an A/B slider as shown below.
Understanding the diff image
- Red pixels are areas that differ between reference and actual
- Yellow pixels are anti-aliasing differences (when anti-alias is not ignored)
- Transparent/original are unchanged areas
提示
If the diff is mostly red, something's really wrong. If it's speckled with a few red pixels around text, you probably just need to bump your threshold.
Configuring the toMatchScreenshot assertion
It's possible to configure the toMatchScreenshot assertion either globally, by changing its default options, or on a per-test basis.
To change the defaults, you have to change the Vitest config:
import { defineConfig } from 'vitest/config'

export default defineConfig({
  test: {
    browser: {
      expect: {
        toMatchScreenshot: {
          comparatorName: 'pixelmatch',
          comparatorOptions: {
            // 0-1, how different can colors be?
            threshold: 0.2,
            // 1% of pixels can differ
            allowedMismatchedPixelRatio: 0.01,
          },
        },
      },
    },
  },
})
For more fine-grained control, override global settings in specific tests by passing options directly to the assertion:
await expect(element).toMatchScreenshot('button', {
  comparatorName: 'pixelmatch',
  comparatorOptions: {
    // more lax comparison for text-heavy elements
    allowedMismatchedPixelRatio: 0.1,
  },
})
Third-party comparators
Vitest ships with pixelmatch as its built-in comparator. It's fast, compares images pixel-by-pixel, has no native dependencies, and handles the majority of cases well. Perceptual comparators aren't included by default because they bring heavier dependencies and there's no clear single "best one" to pick as different algorithms make different trade-offs, but the comparator API exists precisely to let you plug in whatever fits your needs. This decision may change as the ecosystem matures, though.
For use cases where pixel-level diffing produces excessive noise, a perceptual or structural similarity comparator may be a better fit. These compare images more like a human would, tolerating minor rendering differences while still detecting meaningful visual changes.
There are many algorithms, so these are a useful starting point:
@blazediff/ssim, SSIM (Structural Similarity Index) implementations for perceptual image quality assessment. It offers standard SSIM, MS-SSIM (Multi-Scale SSIM), and Hitchhiker’s SSIM for various use cases@blazediff/gmsd, a single-threaded GMSD (Gradient Magnitude Similarity Deviation) metric for perceptual image quality assessment, good for CI environments
To use one, install and register it:
import ssim from '@blazediff/ssim/ssim'
import type { SsimOptionsExtended } from '@blazediff/ssim/ssim'
import { defineConfig } from 'vitest/config'
declare module 'vitest/browser' {
interface ScreenshotComparatorRegistry {
'standard-ssim': SsimOptionsExtended & {
threshold?: number
}
}
}
export default defineConfig({
test: {
browser: {
expect: {
toMatchScreenshot: {
comparators: {
// naive implementation, always check the library's docs
'standard-ssim': (
reference,
actual,
{ createDiff, ...options }
) => {
const diffBuffer = createDiff
? new Uint8Array(reference.data.length)
: undefined
Once registered, the comparator can be referenced by name in your config or on a per-test basis:
import { defineConfig } from 'vitest/config'

export default defineConfig({
  test: {
    browser: {
      expect: {
        toMatchScreenshot: {
          comparatorName: 'standard-ssim',
        },
      },
    },
  },
})await expect(button).toMatchScreenshot('button', {
comparatorName: 'standard-ssim',
})Best practices
Test specific elements
Unless you explicitly want to test the whole page, prefer capturing specific components to reduce false positives:
// ❌ Captures entire page; prone to unrelated changes
await expect(page).toMatchScreenshot()

// ✅ Captures only the component under test
await expect(
  page.getByRole('article', { name: 'Tote bag' })
).toMatchScreenshot()
Handle dynamic content
Dynamic content like timestamps, user data, or random values will cause tests to fail. Either mock the underlying data sources or mask them using the mask option in screenshotOptions when using the Playwright provider.
const profile = page.getByRole(
  'article',
  { name: 'Gracie\'s profile' },
)

await expect(profile).toMatchScreenshot({
  screenshotOptions: {
    mask: [profile.getByRole('status')],
  },
})
Disable animations
提示
When using the Playwright provider, animations are automatically disabled when using the built-in assertion: the animations option's value in screenshotOptions is set to "disabled" by default.
If you prefer to disable all animations to save some execution time, continue reading.
Animations can cause flaky tests. Disable them during testing by injecting a custom CSS snippet using setupFiles or directly in your tests:
const stylesheet = document.createElement('style')

stylesheet.textContent = /* css */`
  *, *::before, *::after {
    animation-duration: 0s !important;
    animation-delay: 0s !important;
    transition-duration: 0s !important;
    transition-delay: 0s !important;
  }
`

document.head.appendChild(stylesheet)
Alternatively, you can declare the CSS in a custom HTML template by using browser.testerHtmlPath.
Set appropriate thresholds
Tuning thresholds is tricky. It depends on the content, test environment, what's acceptable for your app, and might also change based on the test.
Vitest does not define a default tolerance for mismatched pixels. The appropriate value depends on your application and environment. The recommendation is to use allowedMismatchedPixelRatio, so that the threshold is computed on the size of the screenshot and not a fixed number.
When setting both allowedMismatchedPixelRatio and allowedMismatchedPixels, Vitest uses whichever limit is stricter.
Use Git LFS
Store reference screenshots in Git LFS if you plan to have a large test suite.
Common issues and solutions
False positives from font rendering
Font availability and rendering varies significantly between systems. Some possible solutions might be to:
Use web fonts and wait for them to load:
ts// wait for fonts to load await document.fonts.ready // continue with your testsIncrease comparison threshold for text-heavy areas:
tsawait expect( page.getByRole('article', { name: 'How to grow tomatoes' }) ).toMatchScreenshot({ comparatorName: 'pixelmatch', comparatorOptions: { // 10% of the pixels are allowed to change allowedMismatchedPixelRatio: 0.1, }, })Consider a shared environment setup for consistent font rendering.
Flaky tests or different screenshot sizes
If tests pass and fail randomly, or if screenshots have different dimensions between runs:
- Wait for everything to load, including loading indicators
- Set explicit viewport sizes:
await page.viewport(1920, 1080) - Check for responsive behavior at viewport boundaries
- Check for unintended animations or transitions
- Increase test timeout for large screenshots
- Consider a shared environment setup
Visual testing for teams
Even with a controlled local setup, references generated on one machine will often fail on another. This matters as soon as more than one person is running the suite.
Running the visual regression suite in a shared environment solves this problem. There are three ways to do this:
- Self-hosted runners (e.g., Docker images), complex to set up and maintain
- Generate references in CI, which requires some setup
- Cloud services, like Azure App Testing, built to solve this exact problem, but usually restricted to specific providers and browsers
Options 2 and 3 are the quickest to get running, so those are covered below.
GitHub runners don't have browsers preinstalled. Install them before running tests, using the steps for your provider:
Playwright makes this easy. Just pin your version and add this step before running tests:
# ...the rest of the workflow
- name: Install Playwright Browsers
  run: npx --no playwright install --with-deps --only-shell
Then in your existing workflow run the visual tests:
# ...the rest of the workflow
# ...browser setup
- name: Visual Regression Testing
  run: npm run test:visual
The update workflow
Running vitest --update locally would generate screenshots on your machine, defeating the whole point of a controlled environment. Instead, you need a way to trigger the update in CI where the environment matches the one that runs the tests.
You don't want this to happen automatically on every PR (chaos!). Instead, create a manually-triggered workflow that runs when there are intentional changes to the UI.
The workflow below:
- Only runs on feature branches (never on main)
- Credits the person who triggered it as co-author
- Prevents concurrent runs on the same branch
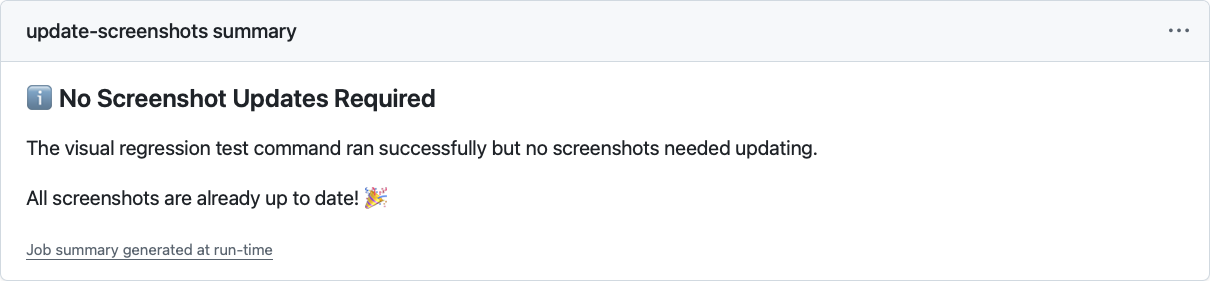
- Shows a nice summary:
When screenshots changed, it lists what changed
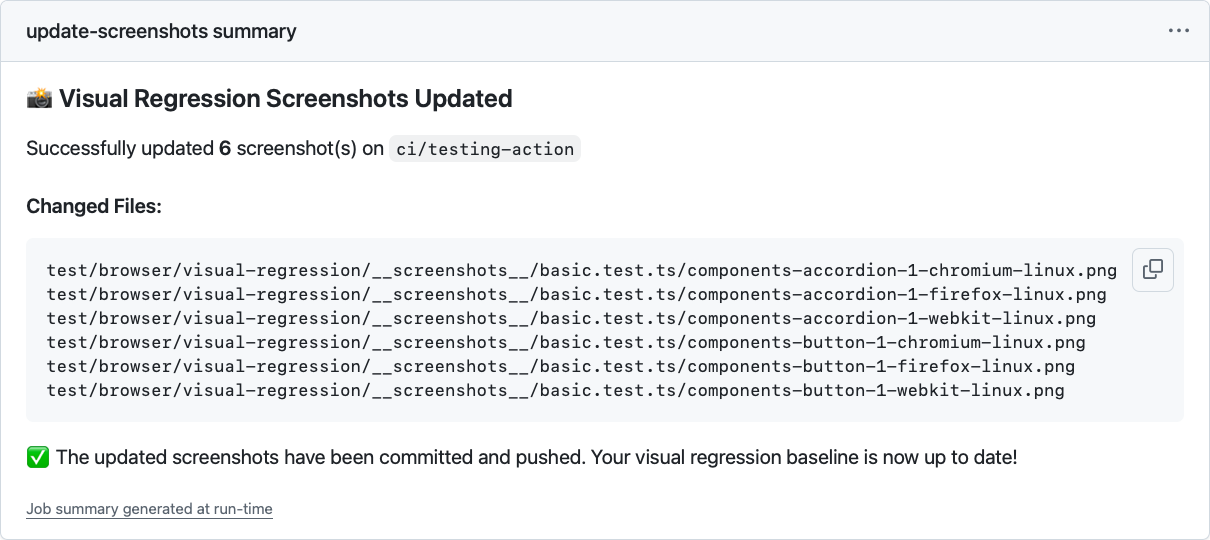
When nothing changed, well, it tells you that too
提示
This is just one approach. Some prefer PR comments (/update-screenshots), others use labels. Adjust it to fit your workflow.
The important part is having a controlled way to update reference screenshots.
name: Update Visual Regression Screenshots

on:
  workflow_dispatch: # manual trigger only

env:
  AUTHOR_NAME: 'github-actions[bot]'
  AUTHOR_EMAIL: '41898282+github-actions[bot]@users.noreply.github.com'
  COMMIT_MESSAGE: |
    test: update visual regression screenshots

    Co-authored-by: ${{ github.actor }} <${{ github.actor_id }}+${{ github.actor }}@users.noreply.github.com>

jobs:
  update-screenshots:
    runs-on: ubuntu-24.04

    # safety first: don't run on main
    if: github.ref_name != github.event.repository.default_branch

    # one at a time per branch
    concurrency:
      group: visual-regression-screenshots@${{ github.ref_name }}
      cancel-in-progress: true

    permissions:
      contents: write # needs to push changes

    steps:
      - name: Checkout selected branch
        uses: actions/checkout@v4
        with:
          ref: ${{ github.ref_name }}
          # use PAT if triggering other workflows
          # token: ${{ secrets.GITHUB_TOKEN }}

      - name: Configure Git
        run: |
          git config --global user.name "${{ env.AUTHOR_NAME }}"
          git config --global user.email "${{ env.AUTHOR_EMAIL }}"

      # your setup steps here (node, pnpm, whatever)
      - name: Setup Node.js
        uses: actions/setup-node@v4
        with:
          node-version: 24

      - name: Install dependencies
        run: npm ci

      - name: Install Playwright Browsers
        run: npx --no playwright install --with-deps --only-shell

      - name: Update Visual Regression Screenshots
        run: npm run test:visual --update

      # check what changed
      - name: Check for changes
        id: check_changes
        run: |
          CHANGED_FILES=$(git status --porcelain | awk '{print $2}')
          if [ "${CHANGED_FILES:+x}" ]; then
            echo "changes=true" >> $GITHUB_OUTPUT
            echo "Changes detected"

            # save the list for the summary
            echo "changed_files<<EOF" >> $GITHUB_OUTPUT
            echo "$CHANGED_FILES" >> $GITHUB_OUTPUT
            echo "EOF" >> $GITHUB_OUTPUT
            echo "changed_count=$(echo "$CHANGED_FILES" | wc -l)" >> $GITHUB_OUTPUT
          else
            echo "changes=false" >> $GITHUB_OUTPUT
            echo "No changes detected"
          fi

      # commit if there are changes
      - name: Commit changes
        if: steps.check_changes.outputs.changes == 'true'
        run: |
          git add -A
          git commit -m "${{ env.COMMIT_MESSAGE }}"

      - name: Push changes
        if: steps.check_changes.outputs.changes == 'true'
        run: git push origin ${{ github.ref_name }}

      # pretty summary for humans
      - name: Summary
        run: |
          if [[ "${{ steps.check_changes.outputs.changes }}" == "true" ]]; then
            echo "### 📸 Visual Regression Screenshots Updated" >> $GITHUB_STEP_SUMMARY
            echo "" >> $GITHUB_STEP_SUMMARY
            echo "Successfully updated **${{ steps.check_changes.outputs.changed_count }}** screenshot(s) on \`${{ github.ref_name }}\`" >> $GITHUB_STEP_SUMMARY
            echo "" >> $GITHUB_STEP_SUMMARY
            echo "#### Changed Files:" >> $GITHUB_STEP_SUMMARY
            echo "\`\`\`" >> $GITHUB_STEP_SUMMARY
            echo "${{ steps.check_changes.outputs.changed_files }}" >> $GITHUB_STEP_SUMMARY
            echo "\`\`\`" >> $GITHUB_STEP_SUMMARY
            echo "" >> $GITHUB_STEP_SUMMARY
            echo "✅ The updated screenshots have been committed and pushed. Your visual regression baseline is now up to date!" >> $GITHUB_STEP_SUMMARY
          else
            echo "### ℹ️ No Screenshot Updates Required" >> $GITHUB_STEP_SUMMARY
            echo "" >> $GITHUB_STEP_SUMMARY
            echo "The visual regression test command ran successfully but no screenshots needed updating." >> $GITHUB_STEP_SUMMARY
            echo "" >> $GITHUB_STEP_SUMMARY
            echo "All screenshots are already up to date! 🎉" >> $GITHUB_STEP_SUMMARY
          fi
Picking the right option
All approaches work. The real question is what pain points matter most to you and your team.
If you're comfortable with containerization, a self-hosted Docker setup gives you a controlled environment without any external dependencies or costs. The downside is maintenance as you own the setup, the browser versions, and any breakage.
CI runs work with any browser provider and give you full control, but screenshots can only be generated in CI. If someone runs vitest --update locally and commits the result, those references will likely fail on the next CI run. This is preventable by guarding the command behind a CI environment check.
A cloud service makes sense if you want developers to be able to run and update visual tests locally without risking mismatched references. It becomes even more useful when designers are involved in reviewing changes, or when the push-wait-check-fix-push cycle becomes a real bottleneck.
Still on the fence? Start with the CI workflow. You can always move to a container or cloud service later if it becomes a pain point.
Going deeper
How Vitest ensures screenshot stability
Visual regression tests rely on screenshots remaining stable across runs. In practice, pages are not instantly stable: images load asynchronously, animations finish at different times, fonts render, and layouts settle. To mitigate this, Vitest uses a "Stable Screenshot Detection" strategy:
- It takes an initial screenshot (or uses the reference screenshot if available) as baseline
- It takes another screenshot and compares it with the baseline
- If the screenshots match, the page is stable and testing continues
- If they differ, Vitest uses the newest screenshot as the baseline and repeats
- This continues until stability is achieved or the timeout is reached
This ensures that transient visual changes (like loading spinners or animations) don't cause false positives. If something never stops animating, though, you'll hit the timeout, so consider disabling animations during testing.
If a stable screenshot is captured after one or more retries and a reference screenshot exists, Vitest performs a final comparison with the reference using createDiff: true. This will generate a diff image if they don't match.
During stability detection, Vitest calls comparators with createDiff: false since it only needs to know if screenshots match. This keeps the detection process fast.